Pixafy recently delved into some useful, lesser-known Magento features that may be “hiding” in plain sight. Today, we’re following up with a compilation of simple, lesser-used WordPress features from our team that can prove to be handy for users and developers, alike.
Screen Options
You may be surprised to find that there are more options and functionalities in different WordPress sections than meets the eye. To explore other widgets available to you, simply click on the “Screen Options” tab at the top-right of many WordPress sections. For instance, in the Posts screen, you’ll see the following options:
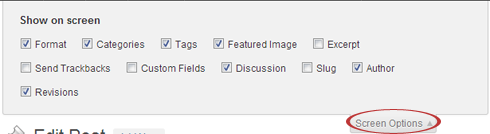
A couple of additional widgets you can enable in the “Screen Options” tab for the Posts section are:
- Excerpt: Create custom excerpts for your posts.
- Send Trackbacks: Send trackbacks to blogs that you’ve linked to in your posts.
- Custom Fields: Assign custom fields to a post, or meta data.
- Discussion: Set up your preferences for comments, trackbacks, and pingbacks. If you happen to remove commenting abilities for a particular post, you can uncheck “Allow Comments” in this section.
- Slug: Designate a URL-friendly version of the post title. They can be used with permalinks, as they help describe the content found at the URL.
- Author: Change the listed author of the post if you have multiple contributors to your site.
Revisions
Another handy feature you can enable in Screen Options offered is the Revisions management panel, where it is possible to review Posts and Pages revisions, as well as comparing versions, so that the content can be reverted back to a specific point.
- Specify number of post revisions: If you’d like to increase or decrease the number of post revisions saved, you have the ability to customize that number.To keep the revisions panel slim and save space in the database, it is possible to limit the number of revisions by adding the following line to wp-config.php:
define('WP_POST_REVISIONS', 5);
- Disable post revisions: Alternatively, it is possible to disable the revisions feature altogether by adding this line to wp-config.php, instead:
define('WP_POST_REVISIONS', false );
“More” tag: split up a post and insert a “Continue Reading” link
On Pixafy’s blog, you will typically see an introduction paragraph for each post, followed by a “Continue Reading” link that you can click to access the rest of the post. You can easily achieve this by using the “More” tag to split up a post.
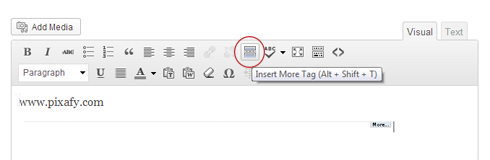
If you’re using the Rich Text / Visual editor, you can click on the icon for “Insert More tag”:
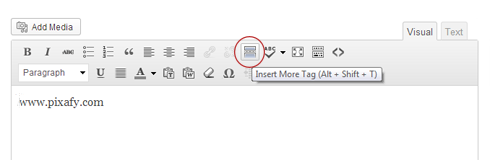
Now, everything that you post following the “More…” line will be visible after clicking the “Continue Reading” link of your post.
If you’re posting via HTML mode, then you can simply insert the following to add the “Continue Reading” link:
<!--more-->
“Nextpage” Page-Link tag: split a post into several pages
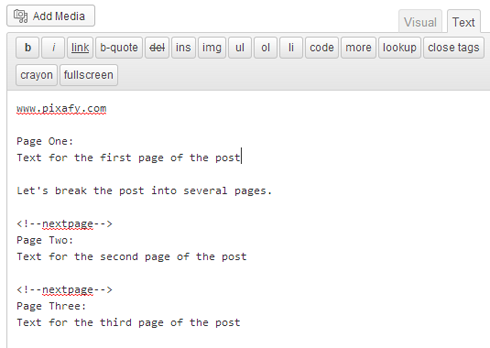
When you have a lot of content for a post, you may choose to split up the material into several pages. To do so, click on the HTML / Text editor and insert the tag preceding the start of where you want each new page to begin:
<!--nextpage-->
To insert “nextpage” into your post, you will need to use the HTML / Text editor. There used to be a quicktag button for this function but it was removed to minimize clutter on the quicktag bar.
Here’s what the page-link tag would look like when implemented in the HTML / Text editor:
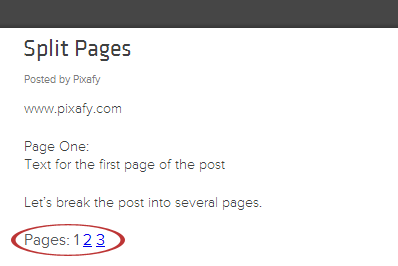
And now, when you preview your post, you’ll see links to the various pages you split from your original content:
Sticky Posts
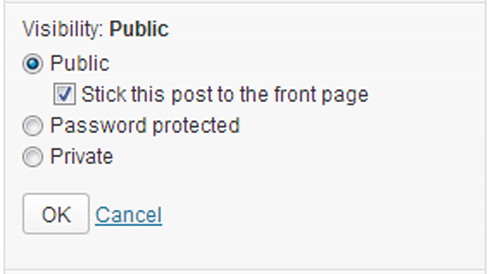
If you blog regularly, you may notice that some of your posts are consistently popular with viewers, while other posts seem to speak to a smaller audience. You may want to feature some content more prominently to your viewer base to increase exposure. WordPress makes it easy to do that with the “Sticky” feature. Simply click the Edit link from the Publish widget of your post and check the box that says, “Stick this post to the front page”:
Depending on the way your theme was created, this should keep your “sticky-ed” post at the top of your page.
AutoSave
By default, WordPress is set to auto-save new posts and pages so content is not lost in case something unexpected happens, such as a power outage or a sudden browser crash. You can actually adjust the auto-save interval to better fit your needs by adding the following line in the wp-config.php file (before the wp-settings.php call):
define('AUTOSAVE_INTERVAL', 600);
Note: The unit used (in this case, “600”) is in seconds.
It is also possible to disable the auto-save feature by adding the following to the functions.php file:
function no_autosave() {
wp_deregister_script('autosave');
}

add_action( 'wp_print_scripts' , 'no_autosave' );
Fullscreen Mode
With all of these options in WordPress, maybe you just want to be able to clear all the clutter in order to focus on writing your content! Thankfully, you can go into “Fullscreen” mode in WordPress with a simple click of the button:

Fullscreen can help create a distraction-free writing setting for you!
Are there any “hidden” or underutilized WordPress features that you find handy? We’d love to hear about them in the comments!
[series_block]
This post is part of a series on lesser-known features of popular platforms:
- Part 1: Hiding in plain sight: Lesser-known features of Magento
- Part 2: Hiding in plain sight: Lesser-known features of WordPress (current)
[/series_block]