In Part I of this series, we gave a few quick tips for de-cluttering the WordPress dashboard without a single line of code and introduced the remove_theme_support() function. If you’ve followed along, your WordPress Dashboard should have organized pages, well-categorized/tagged posts, and no redundant meta boxes. Now, we’re going to introduce the basics of custom post types, which will help take your blog posts, news posts, whatever posts, and give them each their own space on the dashboard!
Custom Post Types Demystified
We’re still going to be using the functions.php file. In a nutshell, custom post types allow us to create a new “type” of post or page and customize what options will be available to the user. For example, let’s say the site you’re building is a cooking site and there are two types of posts, general news and recipes. Maybe for recipe posts, you’ll be using custom fields to list ingredients and you don’t want those fields present for news posts because they don’t serve a purpose – they’ll only display for recipe posts. Sure, you can leave these fields there, but not only will they be frivolous, they can mislead the user.
Creating a custom post type can help you resolve this by creating post groups that are independent, and certain fields will not be present unless you want them to be.
We want our new post type to behave just like the default WordPress post. First, we have to register this new post type for recipes. The basic function looks like this:
function create_post_types() {

register_post_type( 'recipe_post',

array(

'labels' => array(

'name' => __( 'Recipe Posts' ),

'singular_name' => __( 'Recipe Post' )

),

'public' => true,

'menu_position' => 5,

'supports' => array('title','editor','author','thumbnail','custom-fields','revisions','comments' ),

'taxonomies' => array('category', 'post_tag')

)

);

}

add_action( 'init', 'create_post_types' );
All of this is explained in the codex description for register_post_type(). Let’s just go over it briefly.
First, we place our register_post_type into a function called create_post_types. At the end, we call add_action(‘init’,’function_name’). This is good practice so that our functionality runs after WordPress loads with init. And if we continue to register more post types, we can put them all in this one create_post_types function for neater code.
array(

'labels' => array(

'name' => __( 'Recipe Posts' ),

'singular_name' => __( 'Recipe Post' )

)
This is how we’re referring to this new post type in its Singular and Plural form. A good visual example of where this is useful is on the Posts tab on the dashboard sidebar. Where it says “Posts”, for our recipe posts, it will say “Recipe Posts”. We’re just telling WordPress how we’re referring to these on the dashboard menus. (Screenshot-D)
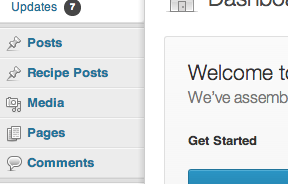
Screenshot-D
'public' => true,

'menu_position' => 5,
This is set to public because we want this post type available for the user to use and edit. We also want these Recipe Posts to be right under the default Posts tab on the sidebar for accurate grouping. The position number for that is set to 5.
'supports' => array('title','editor','author','thumbnail','custom-fields','revisions','comments' ),

'taxonomies' => array('category', 'post_tag')
And finally, we’re just adding support for categories, tags, the title field, the text editor field and all the other options that are normally available on a default post. Notice that we also don’t support post formats because for our particular theme, we don’t have use for them (see part I to see why you may or may not want to do this).
If you save your changes in functions.php, and refresh your dashboard in the browser, you should see your new post type on the sidebar. (See Screenshot-F)
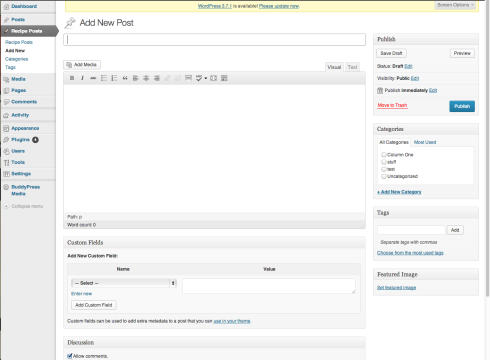
Screenshot-F
Now the recipes posts are successfully in a place of their own without having to filter through what can end up as thousands of WordPress posts all in that one “Posts” tab. You can begin to see how this is useful already.
A few last tips
Now there are plugins that do this for you, as well as assign fields to these post types. The benefit of creating these post types yourself is that you have full control over them and can let the plugin take care of the custom fields if that’s the route you’re going.
You can make several of these custom post types and get rid of anything that isn’t necessary, such as having a Video Post with nothing, but a magic field to drop in an iframe and a title field. Or maybe your Recipe Posts have everything a default post does except you don’t want to have revisions, comments, or authors. All this customization is at your fingertips to simplify the UI to your client’s needs.
If there are any last tips I can offer to those dabbling in custom post types, here are a few so that you can learn from my mistakes:
- Make sure your exclude_from_search and has_archive are set to the value you want. Depending on the purpose of your posts, by default, if your post type is set to public, these values will be set to true – but you may not want that if you don’t want these posts to appear in a search query or for users to find the archive.
- If you’re going to use custom post types on your blog roll, you’ll have to edit the loops. By default, WordPress will only include it’s own default posts in the blog roll loop so you’ll have to do some tweaking if you’re including your own.
- And lastly, if you’re assigning particular templates to your custom post types, check in your theme’s index.php file (this may depend on the theme, but whatever theme assigns the template for default posts) – once you’ve tweaked any loops to your liking, you want to make sure your custom post types are using the templates you want.
In Conclusion
By now, your dashboard should have well organized pages and posts, and only options/meta boxes that serve a purpose. By taking the time to de-clutter the UI of your WordPress dashboard, you’ve now eliminated any bewilderment your user might face when logging in – or at the very least, you’ve only given them the tools they need to succeed.
And with an attention span of 8 seconds, having a site that looks great on the front-end, but is also clean and to the point on the back-end, will keep the goldfish- I mean, Internet users, eternally grateful.
What WordPress pain points do you have? Did this help simplify your WordPress dashboard? We’d love to hear from you, so drop us a line in comments or tweet us @Pixafy!